📜 Table of Contents
Building your own gaming PC remains one of the most rewarding experiences for gamers and tech enthusiasts. The process offers better value, customization options, and upgrade flexibility compared to pre-built systems. This comprehensive guide walks you through everything you need to know about planning, building, and optimizing a gaming PC in 2025, whether you are a complete beginner or looking to refresh your knowledge.
Why Build Your Own Gaming PC
Value and Performance Benefits
Custom-built gaming PCs typically offer better performance per dollar than pre-built alternatives. You choose exactly the components that matter for your gaming needs, avoiding overspending on features you do not need while investing appropriately in areas that impact your experience. Pre-built systems often include lower-quality power supplies, generic cooling solutions, and proprietary parts that limit future upgrades. Building yourself ensures quality components throughout.
Customization and Flexibility
Building allows complete customization to match your preferences and requirements. Choose aesthetics that appeal to you, from understated professional to RGB-illuminated showcase builds. Select components optimized for your specific games and use cases. Future upgrades are straightforward since you understand your system completely. This flexibility is simply impossible with most pre-built options.
Learning and Satisfaction
The knowledge gained from building your own PC extends well beyond the initial project. Understanding how components work together helps with troubleshooting, upgrades, and informed purchasing decisions for years to come. The satisfaction of gaming on a system you built yourself adds to the experience. Many builders find the process itself enjoyable, leading to building systems for friends and family or making it an ongoing hobby.
Planning Your Build
Setting Your Budget
Determine your total budget before selecting any components. Gaming PCs range from budget builds around $700-800 that handle most games at 1080p to enthusiast systems exceeding $3000 targeting 4K gaming at maximum settings. Consider what resolution and frame rates you want to achieve, what games you play, and how long you want the system to remain capable without major upgrades. Allocate roughly 35-40% of budget to the graphics card for gaming-focused builds.
Understanding Your Needs
Different gaming scenarios require different component priorities. Competitive esports players prioritize high frame rates, making CPU and fast RAM important for titles like Valorant or Counter-Strike. Single-player gamers focused on visual fidelity should invest heavily in graphics cards. Those who stream while gaming need more CPU cores and memory. Content creators should consider workstation-class features. Identify your primary use cases before selecting components.
Future-Proofing Considerations
While no system remains cutting-edge forever, thoughtful choices can extend useful life. Select motherboards with upgrade paths for future processors and memory standards. Choose cases with good airflow that accommodate larger components. Invest in quality power supplies rated higher than current needs to support future upgrades. Balance future-proofing against paying premiums for features you may never use.
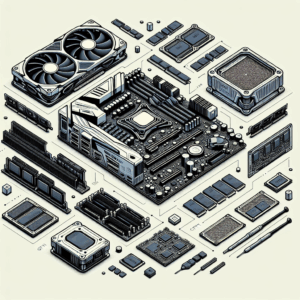
Essential Components Explained
Processor (CPU)
The CPU handles game logic, physics calculations, and system management tasks. For gaming, both AMD and Intel offer excellent options at various price points. Current generation processors from either company handle modern games well. Core count matters less for most games than single-thread performance, though streaming and multitasking benefit from additional cores. Match CPU tier to your graphics card to avoid bottlenecks where one component limits the others potential.
Graphics Card (GPU)
The graphics card is the most important component for gaming performance, rendering the visuals you see on screen. NVIDIA and AMD compete closely, with each offering advantages at different price points. Higher-end cards enable higher resolutions and frame rates with better visual quality. Consider your monitor resolution and target frame rate when selecting. The GPU market fluctuates significantly, so check current pricing and availability when purchasing.
Memory (RAM)
RAM provides fast temporary storage for active programs and data. Gaming systems currently benefit from 32GB of DDR5 memory, though 16GB remains sufficient for most games. Memory speed and latency affect performance, particularly with AMD processors. Match memory specifications to your motherboard and processor capabilities. Two matching sticks running in dual-channel configuration outperform single sticks in gaming scenarios.
Storage Solutions
Modern gaming requires fast storage, with NVMe SSDs providing dramatically better load times than traditional hard drives. Install your operating system and frequently played games on an NVMe drive. Larger, slower SSDs or hard drives can store games you play less often. Storage is easily upgraded later, so prioritize other components if budget is tight while ensuring at least 500GB of fast storage for the primary drive.
Motherboard
The motherboard connects all components and determines available features and upgrade paths. Select a motherboard with the correct socket for your chosen processor. Consider the number and type of expansion slots, storage connections, USB ports, and networking features you need. Higher-end boards offer better power delivery for overclocking, more features, and often better build quality. The motherboard rarely limits gaming performance directly but affects overall system capability and longevity.
Power Supply (PSU)
The power supply converts AC wall power to DC power your components use. Quality matters significantly here, as poor power supplies can damage components or fail dangerously. Select units from reputable manufacturers with 80+ efficiency ratings. Calculate your systems power requirements and add headroom for future upgrades. Modular designs simplify cable management and airflow. Never cheap out on the power supply, as failures can destroy expensive components.
Case Selection
The case houses and protects your components while managing airflow and aesthetics. Ensure compatibility with your motherboard size and graphics card length. Good cases offer cable management features, dust filtration, and adequate cooling support. Consider noise levels if the system will be in a quiet environment. While aesthetics are personal preference, prioritize functionality and airflow over pure appearance.
Cooling Solutions
CPUs require cooling solutions to prevent overheating. Stock coolers included with many processors suffice for basic use but limit performance and generate more noise. Aftermarket air coolers offer better cooling and lower noise at reasonable prices. Liquid cooling provides excellent thermal performance but at higher cost and complexity. Match cooling capacity to your processors heat output and any overclocking plans.
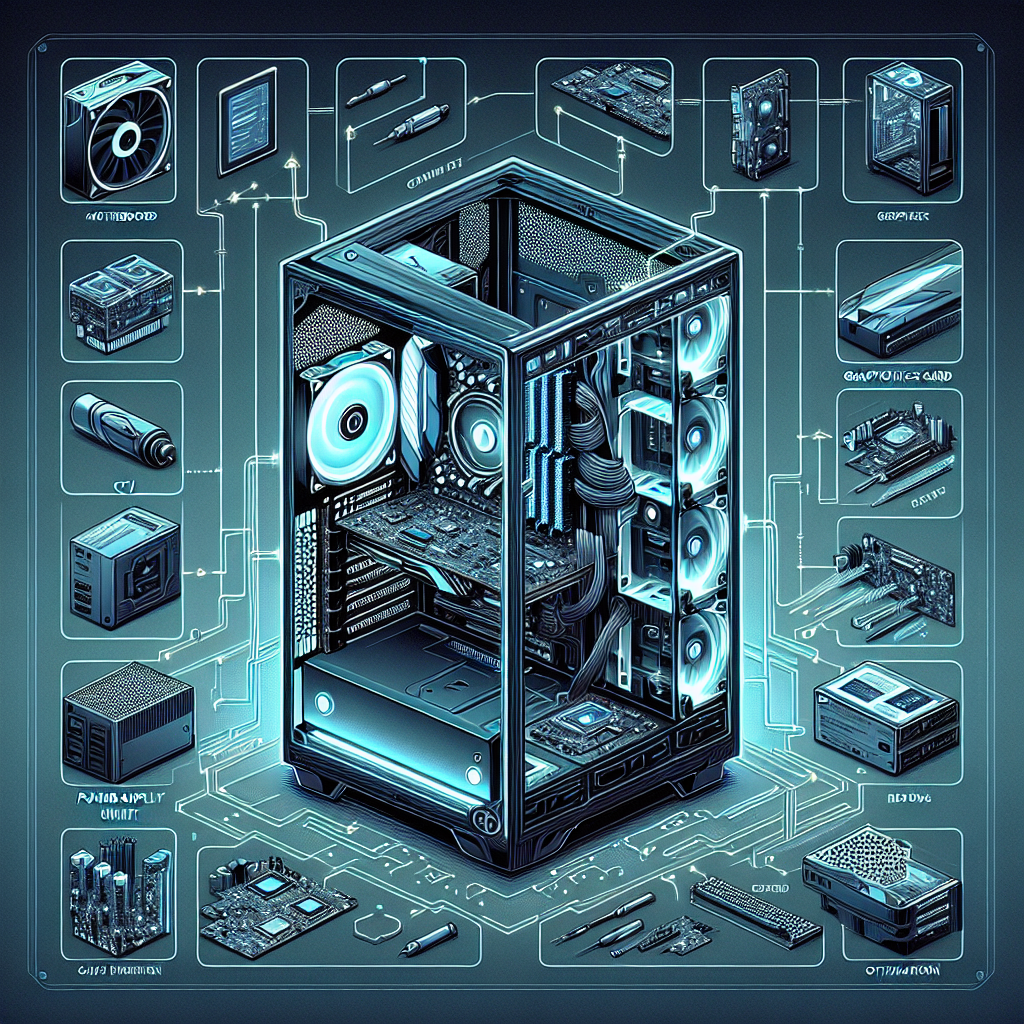
Building Process Step by Step
Preparation and Safety
Before beginning assembly, prepare your workspace and gather necessary tools. A large, clean, well-lit work surface is essential. A Phillips head screwdriver handles most PC building tasks. Anti-static precautions prevent damage from electrostatic discharge; work on a non-carpeted surface and touch the case periodically to discharge static buildup. Read component manuals before starting, noting any specific installation requirements.
Installing the CPU
CPU installation requires care but is straightforward. Open the motherboard CPU socket by lifting the retention mechanism. Align the CPU using the marked corner or notches, ensuring the correct orientation. Gently place the CPU into the socket without forcing it. Lower the retention mechanism to secure the processor. The CPU should drop into place with minimal pressure; if it does not fit easily, check alignment rather than forcing.
Installing Memory
Memory installation is simple but requires attention to slot configuration for optimal performance. Consult your motherboard manual for recommended slots when using two sticks, typically the second and fourth slots from the CPU. Open the retention clips on the slots. Align the notch on the memory stick with the slot key. Press firmly and evenly until clips snap into place. Verify both ends are fully seated.
Installing Storage
NVMe drives install directly onto the motherboard in M.2 slots. Remove any heatsink covering the slot. Insert the drive at an angle into the connector, then lower and secure with the provided screw. Replace the heatsink if present. SATA drives mount in case drive bays and connect to the motherboard and power supply with cables.
Mounting the Motherboard
Install the I/O shield into the case rear opening before mounting the motherboard. Install standoffs in the case matching your motherboard mounting holes. Lower the motherboard onto standoffs, aligning ports with the I/O shield. Secure with screws in all standoff locations, tightening firmly but not excessively.
Installing the CPU Cooler
Cooler installation varies by model, so follow included instructions carefully. Apply thermal paste to the CPU if not pre-applied to the cooler. Mount the cooler according to its design, ensuring even contact with the CPU. Connect the cooler fan to the CPU_FAN header on the motherboard. Verify secure mounting by gently attempting to move the cooler.
Installing the Graphics Card
Remove appropriate PCIe slot covers from the case back. Open the PCIe slot retention clip on the motherboard. Align the graphics card with the slot and press firmly until it clicks into place. Secure with case screws. Large cards may require support brackets to prevent sag.
Connecting Power Supply
Install the power supply in the designated case location. Connect the 24-pin motherboard power cable and CPU power cable. Connect PCIe power cables to the graphics card if required. Connect SATA power to drives. Route cables neatly for airflow and aesthetics. Verify all connections are fully seated.
Final Connections and Testing
Connect case front panel connectors to motherboard headers, including power button, reset button, and LEDs. Connect case fans to appropriate headers. Double-check all connections before first power-on. Connect monitor, keyboard, and mouse. Turn on the power supply and press the power button. Enter BIOS to verify component detection before proceeding with operating system installation.
Software Setup and Optimization
Operating System Installation
Create Windows installation media on a USB drive using Microsofts Media Creation Tool. Boot from the USB drive and follow installation prompts. Perform a clean installation to the primary SSD. Complete initial setup, connect to the internet, and run Windows Update multiple times until no further updates are available.
Driver Installation
Install the latest graphics drivers from NVIDIA or AMD websites. Download and install chipset drivers from your motherboard manufacturers website. Update any other drivers that Windows did not automatically install. Restart after driver installation and verify device manager shows no issues.
BIOS Configuration
Enter BIOS and enable XMP or EXPO profiles to run memory at rated speeds. Configure fan curves for desired balance of cooling and noise. Enable any relevant features for your use case. Update BIOS firmware if a newer version is available, though only do so if there is a specific reason.
Gaming Optimizations
Disable unnecessary startup programs to reduce system overhead. Configure Windows power settings for maximum performance. Set game mode enabled in Windows settings. Install games to your fastest storage. Configure in-game settings to achieve your target frame rate, prioritizing resolution and frame rate over maximum visual quality if needed.
Maintenance and Upgrades
Regular Maintenance
Keep your system clean by periodically removing dust buildup. Compressed air clears dust from components and filters. Clean dust filters according to case design. Monitor temperatures periodically to catch cooling degradation before it becomes problematic. Keep Windows and drivers updated for security and performance.
Planning Future Upgrades
Document your build for future reference. Monitor technology developments to inform upgrade timing. Graphics cards typically provide the most noticeable gaming improvements. Memory upgrades help if current capacity is limiting. Storage expansions accommodate growing game libraries. CPU upgrades depend on motherboard compatibility with newer processors.
Conclusion
Building a gaming PC is an achievable project that rewards you with a personalized, high-performance system. The knowledge gained serves you for years as you maintain, troubleshoot, and upgrade your creation. Take your time, research components thoroughly, and enjoy both the building process and the gaming experiences that follow. Whether this is your first build or one of many, the satisfaction of gaming on hardware you assembled yourself makes the effort worthwhile. Welcome to the PC gaming community.
❓ Frequently Asked Questions

🚀 Keep Exploring
Discover more articles, guides, and tools in PC Gaming